
One of the most important things you can do to improve the performance of your Shopify store is to begin tracking web analytics. Tracking web analytics with a tool like Google Analytics will allow you to see where your customers came from, what they did once they landed on your store page, and allow you to make inferences as to why they did or did not make a purchase. In this guide we walk through all the steps you need to get your Shopify store up and running with Google Analytics.
To connect Google Analytics to Shopify, first you need to create a Google Analytics account. Once your account is created, copy your unique "global site tag" that Google Analytics generates and plug it in to your Shopify settings page. Each of these steps is explained in detail below.
Step 1: Create your Google Analytics account
The first step is to actually create a Google Analytics account. If you already have a Google Analytics account then you can skip this step.
- Go to the Google Analytics website.
- Create a new account by clicking Sign Up

- Fill out the sign up form. Make sure to choose to track a website and fill in the website URL with the exact URL of your Shopify store. Then click Get Tracking ID to finish the account creation.

Step 2: Connect Google Analytics to Shopify
The next step is to link Shopify and Google Analytics. To do this, you will take the Global Site Tag that Google Analytics created and paste it into your Shopify preferences page. This tag contains the javascript that enables Google Analytics to generate analytics and insights for your website.
- In your Google Analytics dashboard navigate to Admin > Property > Tracking Info > Tracking Code

- On the tracking code page you will see a text box that contains the Global Site Tag . Copy all of the text in the textbox to your clipboard.

- Go to the Shopify Admin website. Then navigate to Online Store > Preferences
- In the Google Analytics section, paste your global site tag in the Google Analytics account field:

- Click Save to save this change.
Step 3: Enable E-Commerce tracking
Up to this point Google Analytics is installed on your Shopify store and has begun tracking website traffic. However, By default, Google Analytics doesn't track any E-Commerce specific metrics. By enabling E-Commerce tracking you give Google Analytics the power to track events such as Added product to cart, Added shipping info, Added billing info, and more.
- In your Google Analytics dashboard navigate to Admin > View > Ecommerce Settings
- Click the Enable Ecommerce button to toggle it from OFF to ON.

- Click the Enable Enhanced Ecommerce Reporting button to toggle it from OFF to ON.
- Go to the Shopify Admin website. Then navigate to Online Store > Preferences
- In the Google Analytics section, click the Use Enhanced Ecommerce checkbox

Step 4: Test that your connection worked
If everything has gone well then your Google Analytics account should be connected and analyzing web traffic on your Shopify store! To make sure that everything is working there are a few simple steps you can do.
- Go to the Google Analytics website.
- Go to the Real Time > Overview page and notice that right now there should be 0 active users on your site. (If you see more than zero users, then congrats your set up is working and you can skip the rest of the steps!)

- In a new browser window, load up the homepage of your Shopify store.
- In the Google Analytics realtime window you should now see 1 active user on your site (you!).

Getting the most out of Google Analytics
The default Google Analytics configuration is pretty powerful, but we have a few recommended tweaks to squeeze even more out of it.
Exclude your own IP address
By default, Google Analytics is configured to track all traffic hitting your store. This includes traffic by you or members of your team. It's a good idea to filter out all traffic internal to your company as to not skew the data.
- Run a google search for Whats my ip , and copy that number down.
- In your Google Analytics dashboard navigate to Admin > View > Filters

- Click Add Filter and make a new filter that excludes traffic from your IP address

Exclude certain Referrer domains
Google Analytics shows you which websites generate traffic to your store. For example, if a news website features your store and readers click a link to view your website, then the news website is listed as a source of traffic to your store.
There are some sources that you don't want included in your referral traffic reports. If a customer enters the checkout and then returns to your online store to continue shopping, then the checkout page might be listed as a source.
To filter this traffic out follow the steps below.
- In your Google Analytics dashboard navigate to Admin > Property > Tracking Info > Referral Exclusion List

- Click the Add Referral Exclusion button to add an exclusion for each of the following domains
- The domain name of your store (MikesFlowers.com)
- The checkout domain (checkout.shopify.com)
- Any external payment providers domains (such as paypal.com)
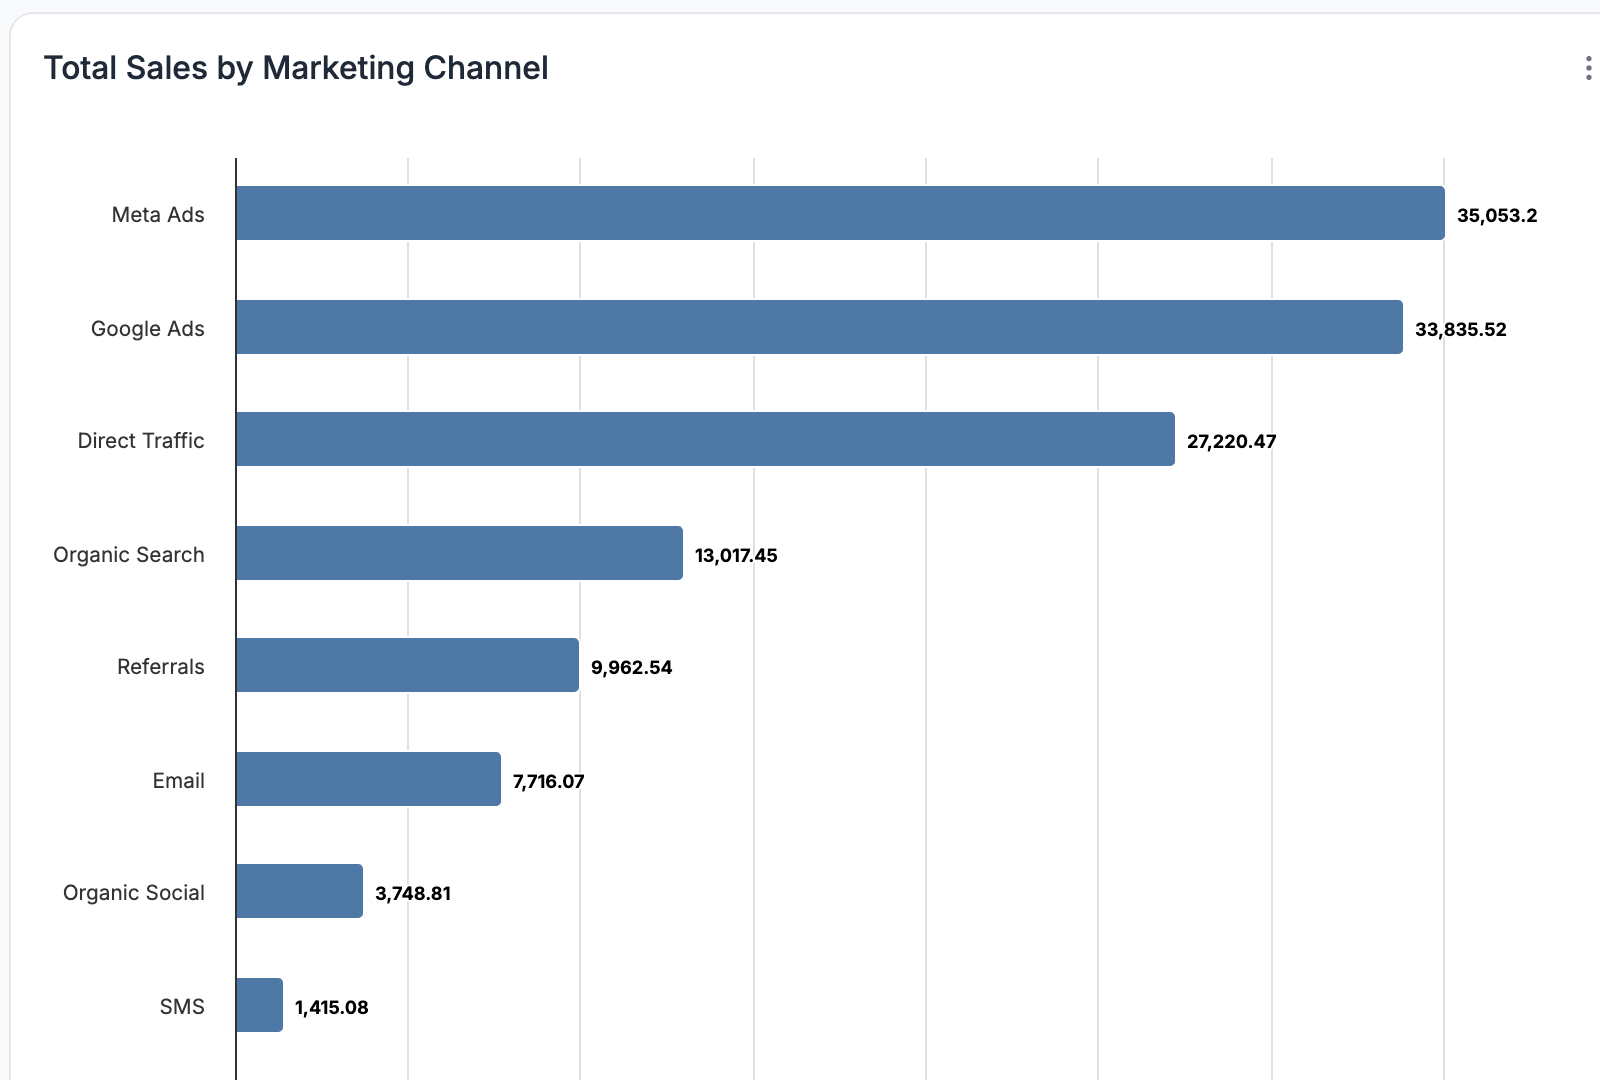
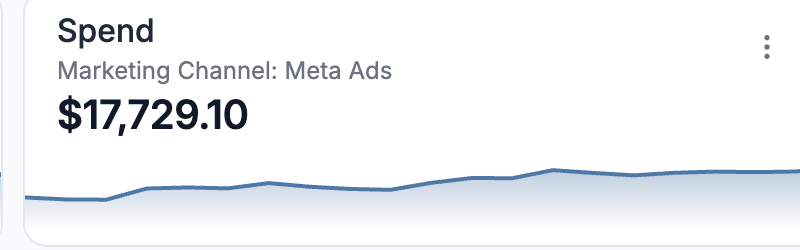
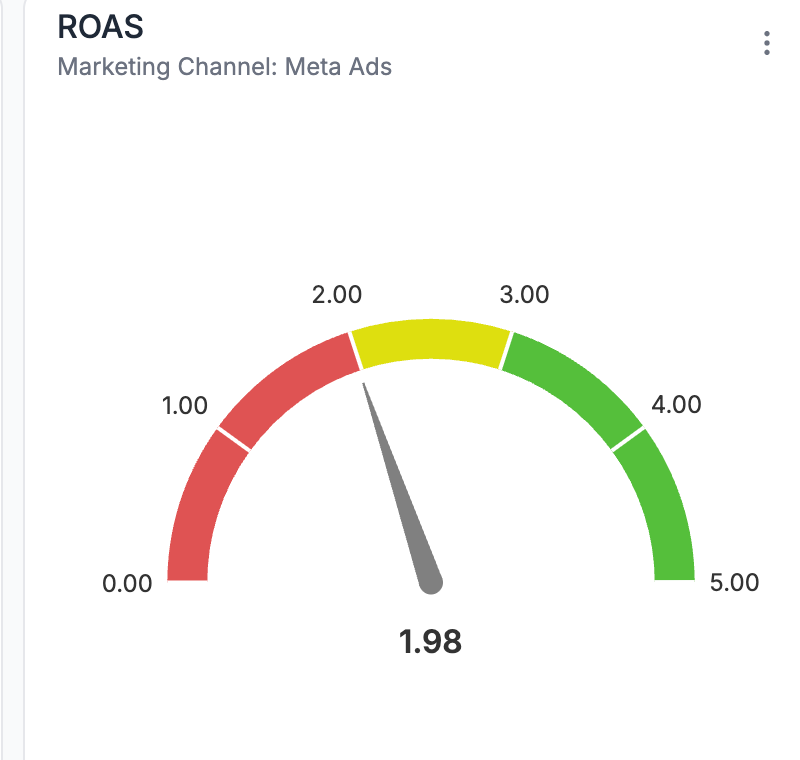
Why is Google Analytics important?
Google Analytics is a very powerful marketing tool that its critically important if you want to be competitive in the E-Commerce space. It gives you visibility into what visitors are doing once they land on your website. You can monitor the effectiveness of your Shopify marketing strategies, product pages and content, user experience, and device functionality. All these statistics show you what is working well, and more importantly, what isn’t.